Could you save someone’s life with CPR?
You might have heard of CPR or know what it is, but do you know how?
CPR, or Cardio-Pulmonary Resuscitation, is a life-saving medical technique. When someone isn’t breathing normally, CPR can keep them alive until first responders or an ambulance arrives.
It seems like a lot, but knowing how to take action in an emergency is better than not.
If you want to be prepared or learn to keep a loved one safe, keep reading for our complete guide to CPR.
Preparation Steps
CPR (Cardiopulmonary Resuscitation) is a life-saving skill. Preparation is a crucial part of CPR training. To help you be well prepared, here are some steps to CPR preparation:
Ensure the Area Is Safe
Before performing CPR, the area must be deemed safe. The person must be taken out of any danger, such as out of a vehicle when it has been in an accident. It would help if you blocked off the area from traffic, and any bystanders should be kept a safe distance away.
Bystanders should call 911 and have an ambulance and other medical personnel dispatched to the location. Any objects or furniture that may be in the way should be moved.
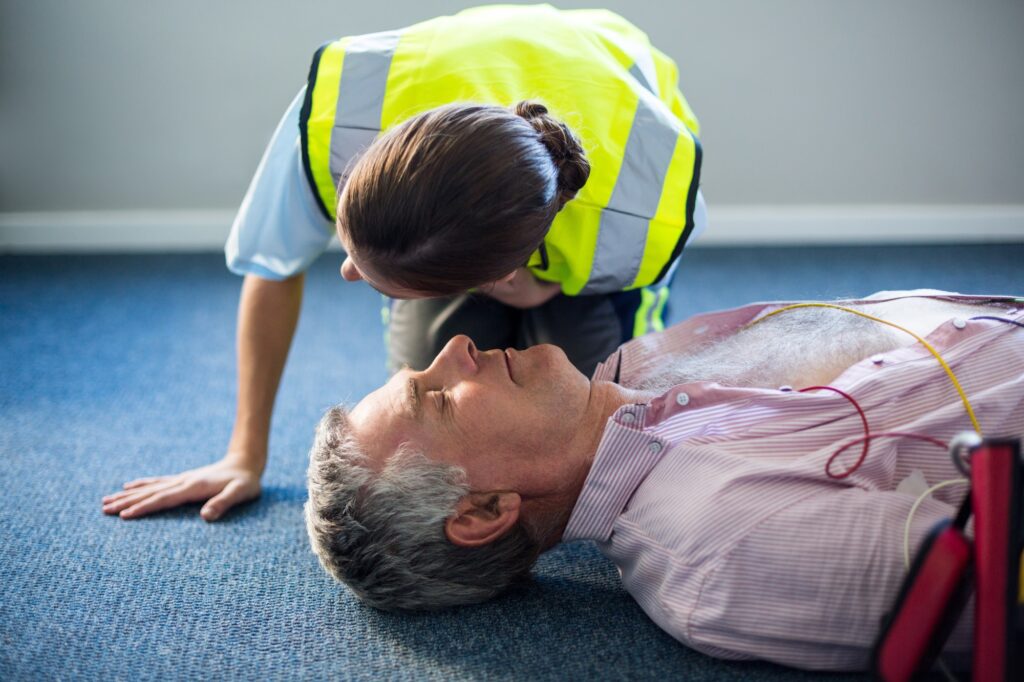
Check the Victim for Responsiveness
When performing CPR, it is essential to check the victim for responsiveness. Gently tap the victim’s shoulder and ask if they are “okay.” If the victim does not respond, proceed and check for breathing.
If not breathing, call 911 and relay information to the dispatcher, including the victim’s age and any known medical history. If a bystander is present, they can help with this step.
Movement or groaning indicates that the victim is still alive and needs immediate medical care. If the heart rate is present, check it with hands firmly placed on the victim’s chest to assess further medical needs.
Position the Person on a Hard Surface
Performing CPR on a person requires positioning them on a hard surface. It will help ensure the chest is properly compressed to the depth needed for effective CPR. The person should be lying flat, facing up.
Any cushions or pillows should be removed so that the surface is as flat as possible and the person can be seen clearly. You should tilt the head back slightly and the chin lifted.
The hard surface should be as close to waist height as possible to help reduce the fatigue of the rescuer while performing chest compressions. Arms should be positioned at the side, and clothes should be removed if necessary. Once the person is set correctly, CPR can begin.
Start the Chest Compressions
To begin chest compressions for CPR, first assess whether the victim is an adult, child, or infant. Place the heel of your hand on the center of the chest and put your other hand on top of it.
You want to keep your arms straight and your shoulders over your hands, locking your elbows. Push down hard and fast in the center of the chest, compressing the chest at least 2 inches. Do this at a rate of at least 100 times per minute.
Avoid leaning on the victim’s chest between compressions. Allow the chest to come back up after each contraction. Check the victim’s pulse every two minutes.
Check That the Airway Is Open
Place the person flat on their back on a hard, even surface to do this. Tilt their head back by placing one hand on their forehead and the other on their chin. Lift the chin up and forward, listen for breathing, and look for a rise and fall of the chest.
If the person is not breathing, you can open their mouth to ensure nothing is blocking the airway. If something is blocking the airway, use your fingers to remove the obstruction.
Supply Breaths
Ensure the airway is open by tilting the head and lifting the chin. Take a deep breath and cover the victim’s mouth with yours. Blow into the victim’s mouth until the chest rises.
Pause and watch the victim’s chest fall to ensure a breath occurs. Give two one-second breaths for adults and one-second breaths for children. Repeat supplying breath every 5 seconds.
Make sure to give at least 120 breaths per minute. Check for pulse between each breath; if there is no pulse, continue CPR and check for a pulse every two minutes.
Repeat the Sequence
If someone’s heart stops, a bystander can save a valuable life by CPR until help arrives. To give CPR until an ambulance or automated external defibrillator (AED) arrives, repeat the chest compression and rescue breathing sequence.
Repeat the sequence twice, then call for emergency help and check for an AED. Continue CPR until help arrives, using AED if available.
Without CPR, the victim won’t survive. Repeating the sequence is the only way to give someone a chance in such a critical medical emergency.
How to Perform CPR for Children and Infants
To perform CPR on children and infants, you must be familiar with the procedure and have the suitable materials available. First, you should assess the situation and call 911 if the child is not responding or breathing.
If a pulse is present, keep the child’s airway open with a head-tilt/chin-lift maneuver and check for normal breathing. If provided with a rescue shield for a child or infant, use it for mouth-to-mouth resuscitation.
Otherwise, perform mouth-to-mouth resuscitation. You should deliver three one-second rescue breaths. Following this, compress the child’s chest with two fingers placed below the nipple line using a ratio of 30 compressions and two breaths.
Deliver these at a rate of 100-120 compressions per minute. Repeat this pattern of rescue breaths and chest compressions until medical help arrives or the child shows signs of life.
CPR needs enough knowledge and confidence. Learn and get certified today at MyCPR NOW.
Explore the Steps to CPR
Overall, this is a vast lifesaver—always remember the steps to CPR, A-B-C: Airway, Breathing, and Circulation. In an emergency, following these steps can help potentially save a life.
Master these steps. Be prepared and knowledgeable. Learn more and stay informed.
We’ve got you covered if you want to explore the best topics. Check out some of our other blogs today!