
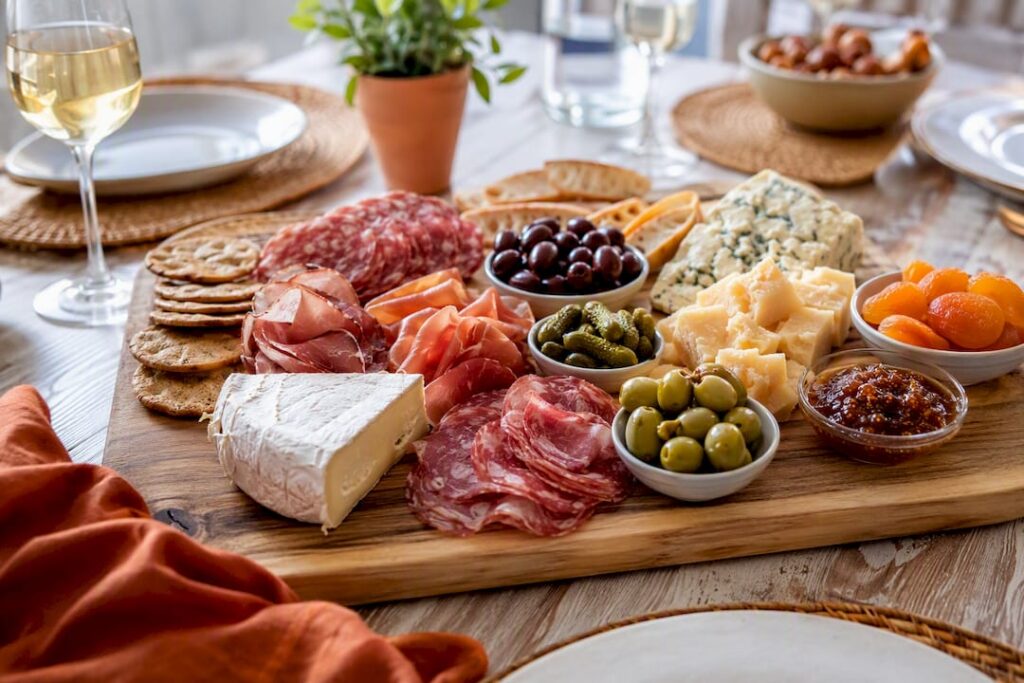
Start with the 3-3-3 rule: three cheeses, three meats, three accompaniments, plus about 2 ounces each of cheese and meat per person for an appetizer spread. Stage your bowls first, add cheese as anchor points, tuck in folded meats, then finish with crackers last so nothing goes soggy. Follow the FDA’s two-hour rule for food safety, and you’ve got a board that looks professional without the stress.
Charcuterie Board Guide: What to Buy by Category
A great board isn’t complicated. It’s a handful of categories, each pulling its own weight in flavor and texture. Once you understand the roles, shopping gets fast and almost foolproof.
Cheese does the heavy lifting, so vary the texture. A soft cheese like brie or goat cheese, a semi-firm option like Gouda or Havarti, and a hard cheese like aged cheddar or Manchego cover the range most palates want. Meats should get the same variety treatment: something delicate like prosciutto, something bold like salami or soppressata, and something spreadable like a good pâté rounds things out nicely.
Briny and acidic bites cut through all that richness. Olives, cornichons, and pickled vegetables reset the palate between bites of fat and salt. On the sweet side, fig jam, local honey, or dried apricots give the board contrast, and they’re the pieces that make cheese taste more interesting rather than just filling.
For crunch, you need both crackers and something starchier. A mix of plain water crackers, a seeded variety, and sliced baguette gives guests options depending on what they’re topping. Nuts, particularly marcona almonds, walnuts, or pistachios, add another layer of crunch and help fill visual gaps. Fresh fruit like grapes, sliced pear, or apple wedges keeps things from feeling too heavy.
Here’s a fast reference for building your cart:
- Cheeses: brie, Gouda, aged cheddar, goat cheese, Manchego
- Meats: prosciutto, salami, soppressata, pâté
- Briny/pickled: castelvetrano olives, cornichons, pickled onions
- Sweet: fig jam, honey, dried apricots
- Crackers/bread: water crackers, seeded crisps, sliced baguette
- Nuts and fruit: marcona almonds, walnuts, grapes, sliced pear
If you’re hosting vegetarians, skip the cured meats and lean harder into cheeses, marinated vegetables, and a good hummus or white bean dip. Going gluten-free just means swapping in rice crackers or vegetable chips and double-checking that your crackers aren’t hiding wheat. For nut allergies, seed-based crunch (pepitas, sunflower seeds) fills the same role without the risk.
On sourcing, the deli counter gets you fresher slices and the option to ask for paper-thin cuts, which fold and drape better on the board. Pre-packaged meats and cheeses save time and work fine in a pinch, but they tend to be cut thicker and don’t shingle as elegantly. If you’re short on time, a mix of both is completely reasonable. Nobody’s grading you on purity here.
How Much Charcuterie Do You Need Per Person?
The math here is simpler than most people expect, and getting it right is the difference between a board that gets picked clean too fast and one with leftovers nobody wants.
For an appetizer board, the standard baseline is 2 to 3 ounces of meat and 2 to 3 ounces of cheese per person, plus a similar amount of accompaniments like crackers, fruit, and nuts. If the board is standing in for an actual meal, say a light dinner before a movie night, double those numbers.
Here’s how that scales out:
- 4 guests (appetizer): 8 to 12 oz cheese, 8 to 12 oz meat, split across 3 varieties each (roughly 3 to 4 oz per cheese, 3 to 4 oz per meat).
- 8 guests (appetizer): 16 to 24 oz cheese, 16 to 24 oz meat, split across 3 to 4 varieties for better variety at scale.
- 12 guests (appetizer): 24 to 36 oz cheese, 24 to 36 oz meat. At this size, consider bumping to a 4-4-4 or 5-5-5 format so no single cheese or meat runs out mid-party.
If your board is doubling as dinner, multiply every number above by two. A 12-person meal board, for instance, lands closer to 48 to 72 ounces of cheese and the same in meat, which is a serious amount of shopping and usually a sign you should build two boards instead of one.
Speaking of which, once you’re feeding more than 15 or so people, a single giant board becomes a traffic jam. Two medium boards placed at opposite ends of the room let guests spread out, and nobody has to reach across a crowd for the salami. It also means if one board gets demolished early, you’ve got a backup ready to refill without an emergency grocery run.
Pro Tip: When shopping for a crowd, round up on your cheese and meat quantities before you round up on crackers. Guests run out of protein and dairy faster than they run out of carbs, and an underfed board is far more noticeable than a slightly light cracker basket.
In What Order Do You Build a Charcuterie Board?
Assembly order matters more than most first-time hosts realize. Build in the wrong sequence and you’ll find yourself repositioning cheese around meat you already placed, or discovering there’s no room left for the crackers. Following a set sequence turns a stressful 20 minutes into a fast, satisfying process.
- Place your bowls and ramekins first. Jam, honey, olives, and anything with liquid or juice needs a container, and those containers are your structural anchors. Set them before anything else touches the board.
- Add cheese as anchor points. Space your three cheeses apart from each other, roughly forming a triangle if your board allows it. This creates the visual skeleton everything else builds around.
- Layer in the meats. Fold or fan your meats near their nearest cheese so flavor pairings make sense, and so guests can grab a natural bite of both without hunting across the board.
- Fill the bowls. Olives, jam, honey, and pickles go into their designated ramekins now that the layout is set.
- Scatter fruit and nuts. These fill the awkward negative space between your anchor points and add color and texture without needing a container.
- Add crackers and bread last. Crackers absorb moisture fast, so they should hit the board as close to serving time as possible.
On timing: slice hard cheeses and pre-slice sturdier meats up to 24 hours ahead and store them separately, wrapped tight. About 6 hours before guests arrive, fill your bowls and refrigerate the whole tray if you have the fridge space. In the final 30 to 45 minutes, do the actual assembly, adding anything delicate like sliced pear or fresh berries at the very end so they don’t brown or weep onto the cheese.
For folding technique, take a slice of prosciutto or salami, fold it in half, then in half again to create a small fan or ribbon shape rather than laying it flat. It looks more intentional and takes up less space, letting you fit more variety onto a smaller board.
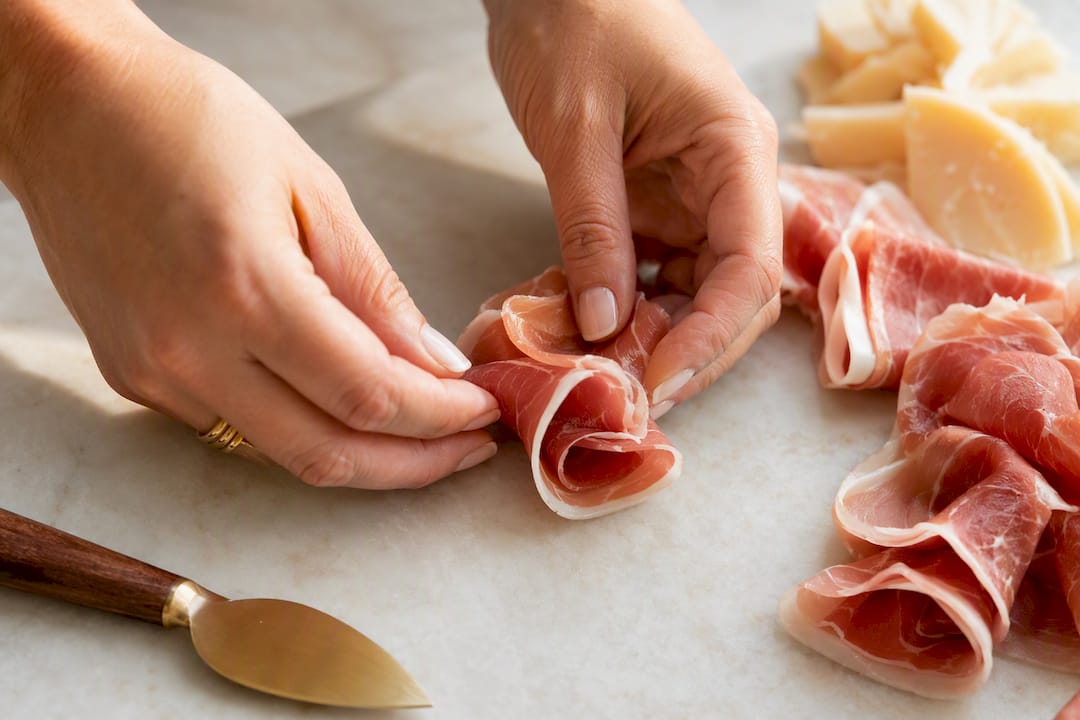
Before guests arrive, do three quick checks: is there visible negative space anywhere (fill it with nuts or fruit), does every bowl have a small spoon or fork sitting in it, and have you pulled your cheese out of the fridge with enough lead time to soften?
How Do You Style a Board So It Looks Abundant?
The difference between a board that looks like an afterthought and one that looks styled comes down to a few visual habits, not natural talent. Cover these and your board will read as full even when you’re working with a modest budget.
Think in terms of anchor points and thirds. Placing your three cheeses at roughly equal intervals around the board, rather than clustering them together, gives your eye natural resting points and makes the whole layout feel more intentional. Contrast matters just as much as placement. Pair a pale cheese next to a dark salami, a bright fig jam near a neutral cracker, so nothing visually blends together into a beige blur.
Small herb sprigs, like rosemary or thyme, tucked into gaps cost almost nothing and instantly make a board look more considered. Grape clusters left on the vine do the same job while adding height, which matters because a completely flat board reads as sparse no matter how much food is actually on it.
A few specific techniques worth borrowing:
- Fold soft meats into ribbons or small roses instead of laying them flat; it looks intentional and saves space.
- Cut a wedge out of a hard cheese wheel and leave the rest whole so guests can see the interior texture.
- Use small clusters of three or five items (three fig halves, five almonds) rather than scattering them randomly, since odd numbers tend to look more natural to the eye.
- Fill every gap. Hosts consistently find that staging bowls and structural pieces first, then filling in the remaining negative space, produces a more balanced, less chaotic result than adding items randomly as you go.
Don’t forget hygiene basics while you’re focused on looks. Every bowl needs its own small spoon, every cheese needs its own knife, and pre-sliced bread means guests aren’t handling a whole loaf with their hands. It’s a small detail, but it’s the one guests notice when it’s missing.
What Size Board and Tools Do You Actually Need?
Board size should match your guest count, not just whatever looks nice in your kitchen. A small board, around 12 by 18 inches, comfortably serves 4 to 6 people. A medium board, roughly 16 by 24 inches, handles 8 to 10 guests. For anything larger, an 18 by 32 inch board or a couple of medium boards placed side by side will serve 12 or more without crowding.
Material matters more than most people think. Wood boards are the most forgiving, hide small imperfections well, and give that classic rustic look most people picture when they hear “charcuterie board.” Marble stays cool, which is genuinely useful for keeping cheese from softening too fast under warm lights. Ceramic platters look formal and clean but chip more easily, and a rimmed sheet pan is the most practical option for outdoor events since it won’t tip food off the edge in a breeze.
Beyond the board itself, a short list of tools makes assembly and serving far smoother:
- Small ramekins or shot glasses for jams, honey, and olives
- A dedicated cheese knife for each cheese (or at least one per texture)
- Tongs or small forks for meats and pickled items
- Cocktail napkins within arm’s reach of the board
- A tray or sheet pan underneath for easy transport if you’re moving the board outdoors
If you’re taking a board to a picnic or someone else’s house, assemble it on a rimmed tray rather than a bare wooden board. It travels flat, catches any spills, and slides right onto a table without a second transfer.
When Should You Prep a Charcuterie Board?
Timing is where most boards go wrong, usually because a host assembles everything too early and the fruit browns or the crackers turn soft before guests even arrive.
Work backward from serving time. About 24 hours ahead, slice your hard cheeses and pre-slice any sturdier meats, then store them wrapped separately in the fridge. Around 6 hours before the event, set out your bowls and fill them with anything shelf-stable like olives, jam, or nuts, then refrigerate the tray if you have room. In the final 30 to 45 minutes, do your actual assembly and add anything delicate, like sliced fruit or fresh herbs, since those items degrade fastest.
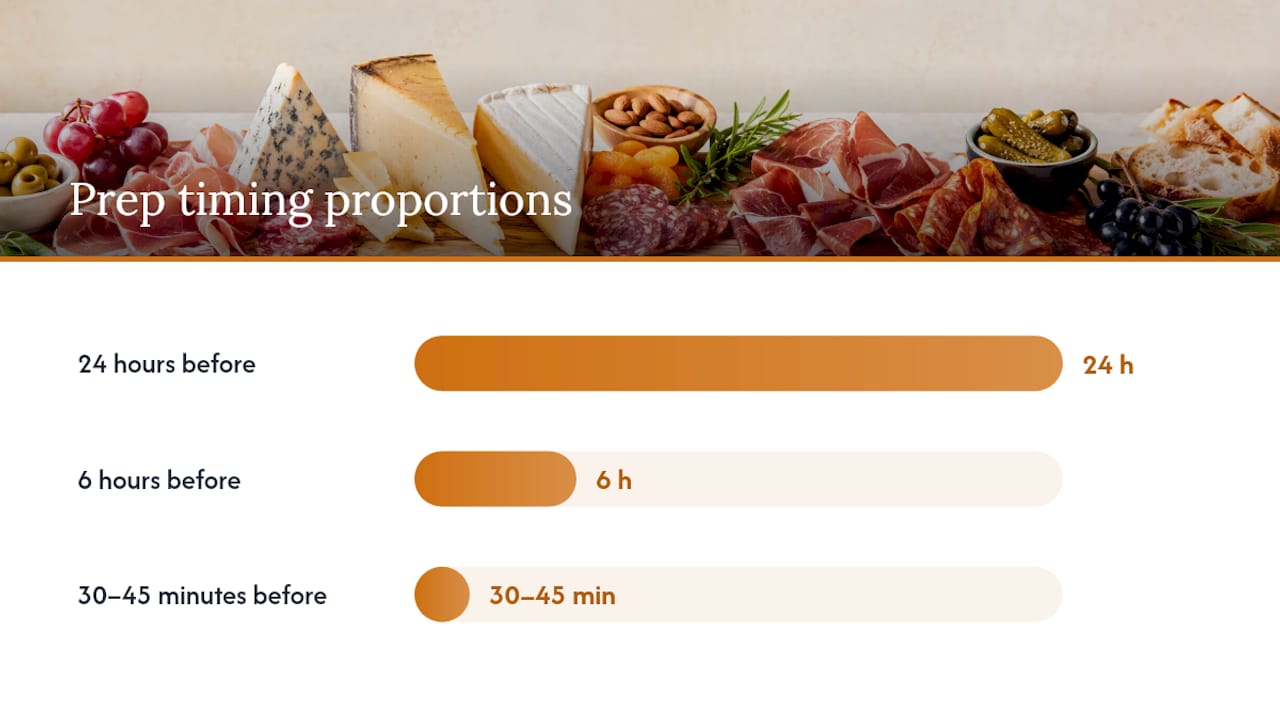
Most visual collapse on a board comes down to exactly this: assembling too early and adding perishable items before they need to go on.
Once the board is out, follow the FDA’s two-hour rule for perishable food left at room temperature. After two hours, meat and cheese should be refrigerated or refreshed with a new batch, especially in a warm room or outdoors in summer. For longer parties, keep backup portions of cheese and meat chilled in the kitchen and swap them in every couple of hours rather than leaving the same spread out for four or five hours straight.
A few storage habits protect your ingredients before and after serving:
- Keep crackers in a sealed container separate from anything moist until the moment you plate them.
- Wrap cut cheese in parchment or wax paper rather than plastic wrap to prevent sweating and let it breathe.
- Store leftover meats and cheeses in airtight containers and use them within a few days in sandwiches or a quick pasta.
- If part of your board never got touched, that unopened cheese or unopened package of meat can go straight back in the fridge without concern.
What Should You Drink With a Charcuterie Board?
Pairing drinks with a board doesn’t require sommelier training. Matching intensity to intensity is really the entire trick, and once you know that rule, you can improvise with whatever’s already in your fridge.
Light, delicate boards built around soft cheeses and mild meats pair naturally with something bright, like a dry sparkling wine or a crisp rosé. Richer, fattier boards with aged cheddar, pâté, and salami hold up better against a fuller white wine, like an oaked Chardonnay, or a light-bodied red like Pinot Noir. If your board leans smoky or spicy, thanks to a chorizo or a peppery salami, a fruit-forward red or a hoppy beer cuts through the heat nicely.
For guests skipping alcohol, sparkling water with a squeeze of citrus works as a genuinely satisfying palate cleanser between bites. A good non-alcoholic cider brings a similar dry, fruity balance, and a chilled herbal iced tea, like hibiscus or mint, pairs surprisingly well with salty cured meats.
Four quick matches to keep in your back pocket:
- Mild cheese and fruit board: dry sparkling wine or sparkling water with lemon
- Rich, fatty board with pâté and cheddar: oaked Chardonnay or light Pinot Noir
- Smoky or spicy board: fruity red wine or a hoppy beer
- All-vegetarian, bright board: dry rosé or herbal iced tea
Charcuterie Board Ideas for Every Occasion
Once the basics click, building themed boards is just a matter of swapping ingredients while keeping the same 3-3-3 skeleton. Here are six starter templates worth keeping on hand.
Classic crowd-pleaser: brie, aged cheddar, prosciutto, salami, castelvetrano olives, fig jam, water crackers, grapes. Scale by adding a fourth cheese and meat for groups over 10. Assembly trick: fold the prosciutto into small roses for visual height.
Vegetarian and plant-forward: goat cheese, Manchego, marinated artichokes, roasted red peppers, hummus, olives, seeded crackers, walnuts. Scale by adding a second dip. Trick: use the hummus bowl as a central anchor point instead of meat.
Seafood and light: smoked salmon, herbed cream cheese, cornichons, capers, lemon wedges, rye crackers, cucumber slices. Scale by adding smoked trout for larger groups. Trick: curl the salmon slices loosely rather than folding, so they hold their shape.
Dessert and sweet board: dark chocolate squares, dried apricots, honeycomb, shortbread cookies, fresh berries, candied nuts. Scale by adding a small bowl of caramel sauce for dipping. Trick: cluster chocolate by type so guests can see their options at a glance.
Picnic and portable: hard cheeses only (they travel better than soft), pre-sliced salami, whole grapes, whole crackers packed separately, nuts in a sealed bag. Scale by packing everything in individual containers rather than pre-assembled. Trick: assemble on-site to avoid soggy crackers in transit.
Holiday wreath layout: arrange cheese, meats, and greenery in a circular wreath shape with a small bowl of cranberry sauce or pomegranate seeds at the center. Scale by using a round platter sized to your guest count. Trick: use rosemary sprigs as the “greenery” connecting each section for a cohesive look.
Stacy’s Take on Hosting Without the Stress
My go-to trick for stress-free hosting is doing all my slicing and bowl-filling the night before, so the only thing left on party day is arranging. It sounds obvious, but I skipped this step for years and always ended up frazzled thirty minutes before guests arrived.
My favorite board for smaller get-togethers is often a rimmed sheet pan rather than a fancy wood board. It travels well, holds more than people expect, and cleanup takes two minutes. My go-to cheese trio is a soft brie, a nutty Gouda, and a sharp aged cheddar. That combination has never once failed to disappear first at a party.
If you’re building a board for an outdoor event, pair it with sturdy paper plates that hold up outside rather than fighting the wind with real dishware. And if you’re weighing wood versus other board materials, this breakdown on cutting board swaps is worth a look before you buy something you won’t actually use twice.
The Overrated Rule and the One That Actually Matters
Most charcuterie advice obsesses over aesthetics: the perfect fan of prosciutto, the ideal cluster of grapes. That’s fine, but it’s not what makes a board succeed. Quantity math and timing are what actually separate a smooth party from a stressed host running to the store mid-event.
The 3-3-3 rule gets treated like gospel, but it’s really just a heuristic for forcing variety into your shopping cart. It’s more useful as a floor than a ceiling. What matters far more is knowing your per-person ounces cold, because that’s the number that prevents both an embarrassingly empty board and a mountain of wasted cheese.
If I’m being blunt: skip the Pinterest-perfect styling anxiety and prioritize getting your quantities and timing right first. A slightly imperfect-looking board with the right amount of food beats a gorgeous one that runs out by 8 p.m., every single time.
— Stacy Geisinger
Where to Find More Hosting Ideas on StacyKnows
If pulling together one great board has you thinking about your next gathering, Stacyknows has you covered for what comes next. Our Food Fashion and Fun hub is full of styling tips, creator picks, and party inspiration well beyond the cheese platter, and it’s the first place to look if you’re planning a bigger spread.

For anyone hosting outdoors this season, our guide on making your next outdoor private event special walks through the details that turn a backyard gathering into something guests actually remember, from setup to flow to the little touches that matter. Bookmark it before your next event and you’ll have one less thing to figure out on the fly.
Sources
- How to Build a Perfect Charcuterie Board: Meats, Cheeses & Assembly | Food Network
- How to Make a Perfect Charcuterie Board | The Kitchn
- Charcuterie Board: A Hosting System (Not a Photo Op) | The Kind Host
FAQ
What Is the 3-3-3 Rule for Charcuterie Boards?
It means picking three cheeses, three meats, and three accompaniments as your starting shopping list, which forces variety in flavor and texture without overthinking it. For groups over 10, scale it up to a 4-4-4 or 5-5-5 format.
What Are Five Things to Avoid on a Charcuterie Board?
Avoid overly wet items without a bowl, cheeses that are too similar in texture, meats left unfolded and flat, crackers added too early so they go soft, and leaving the board out past the two-hour food safety window.
In What Order Do You Make a Charcuterie Board?
Place bowls and ramekins first, add cheese as anchor points, layer in folded meats next, fill the bowls with jams and olives, scatter fruit and nuts into gaps, then finish with crackers and bread right before serving.
What Are the Top Things to Put on a Charcuterie Board?
A strong lineup includes brie, aged cheddar, and Gouda for cheese; prosciutto, salami, and pâté for meat; plus olives, fig jam, honey, crackers, nuts, and fresh fruit like grapes or sliced pear to round it out.
How Long Can a Charcuterie Board Sit Out Safely?
Perishable items like meat and cheese should not sit at room temperature longer than two hours, per FDA-aligned food safety guidance. For longer events, refresh the board with chilled backups every couple of hours instead of leaving one batch out the whole time.
Recommended
- Unique Twists on Your Wine Tasting Girls Night
- I Went to Dinner at Cabbage Hill Farm—and Discovered They’ll Bring the Farm Dinner to You
